Tuesday, April 20, 2021

Management of Normal Labor

NORMAL LABOR/ EUTOCIA 

- Spontaneous onset 
- At term 
- Vertex presentation 
- Without undue prolongation 
- Natural termination with minimal aids 
- Without any complications

ADMISSION: 
1. Admit in waiting ward if in early labor OR admit in Labor Ward if cervix > 4 cm dilated, uterine activity is optimum, show, and/or spontaneous rupture of membranes present. Delay transfer to the labor ward until in active labor (i.e., equal to or greater than 4 cm dilatation practically) is established

2. Confirm reports of Hemoglobin, blood group, VDRL, plasma sugar (fasting and postprandial or random), HIV, HBsAg, urinalysis, TSH, and obstetric ultrasonography are ready and normal. If not, get them done without compromising care
 
3. Check if she has received tetanus immunization. If the patient is not immunized and directly presents during labor, give tetanus immunization to her immediately and the child after delivery is given tetanus immunoglobulin

4. Send blood for cross matching only if there is an indication for the same

FIRST STAGE: 
From true labor pains to full cervical dilatation. (≈10 cm)
 

Foetal heart rate (FHR) is monitored every 30 mins in first stage, 15 mins in second stage. 

In high risk pregnancies, FHR is monitored every 15 mins in first stage, 5 mins in second stage. 

Orders 
● Shave/ clip hair and prepare private parts 
● Simple enema stat 
● Left lateral position 
● Liquids/ soft diet orally 

● MATERNAL VITAL SIGNS: Temperature, pulse and blood pressure are evaluated at least every 1/2 hourly

● SUBSEQUENT CERVICAL EXAMINATIONS: Cervical dilatation and presenting part evaluated by PV every 4 hours

● ORAL INTAKE: Food should be withheld during labor and delivery as gastric emptying is remarkably prolonged once labor is established/ analgesia is given
-Sips of clear fluids (or fruit juices) are permitted to prevent dehydration
-Allow a gravida at low risk of requiring general anesthesia to eat low residue food or drink as desired or tolerated
-Usually a pint of Ringer Lactate also given to the patient

● URINARY BLADDER FUNCTION: Mother should void the bladder if possible, else catheterize and drain the urine using a simple red rubber catheter. (Distension of bladder is to be avoided as it can interfere with the fetal presenting part and lead to subsequent bladder hypotonia and infection) 

Consider amniotomy in active phase of labor (done by senior residents, not expected from interns). 
If the membranes are ruptured, IV antibiotic is started. 

SECOND STAGE: 
With full cervical dilatation and engaged presenting part, encourage the patient to bear down when the female feels the urge to push (with each uterine contraction).


Permit delay in pushing when the presenting part is above station +2, occiput is not in anterior position, as long as the fetus is well. 

The woman should be allowed to push with open or closed glottis (Valsalva manoeuvre) according to her preference. 

Continue intrapartum monitoring.

PREVENTION OF PERINEAL TEARS:  
● Application of warm perineal compresses: relaxes the muscles
● Perineal massage 
● Provide perineal support when head is coming out
● Avoid routine episiotomy (Although this is routinely done in most of the government hospitals) 
● Avoid fundal pressure

EPISIOTOMY: Done under pudendal nerve block using lignocaine during crowning when the head descends down (baby is being pushed). Cut at the time of contraction only. Mediolateral episiotomy at 60 degree on a stretched perineum is given using episiotomy scissors. 

Delivering the Baby: Ask a person to provide urethral support (put index and middle finger in the vagina against the anterior vaginal wall)  while you provide perineal support (put index fingers of both your hands inside the vagina and stretch it downwards and laterally).
Do modified RITGEN manoeuvre (Perineal support plus hand on occiput to cause controlled extension of head means the head is delivered in extension and trunk by lateral flexion). 


Immediately ask the sister to give oxytocin 10 IU given i.m
If i.v. line already in-situ, 10 IU of oxytocin is injected into the RL pouch
 
Delay umbilical cord clamping for 1 minute or till cord pulsations stop if the newborn does not require neonatal resuscitation or is  not a case of Rh isoimmunization.
 
● During this time, encourage maternal-neonatal skin to skin contact provided there are no maternal or neonatal complications while drying the neonate. Place the naked term infant on the mother's bare abdomen and cover them with a clean warm sheet.
 
● Touch the cord to check if the pulsation stops. After this, three Kocher's clamps are applied on the cord (2 towards the baby and 1 towards the placenta) and the cord is cut in between ( Provides extra 80 ml of blood to fetus).
 
● After this the baby is handed over to the neonatologist. In case of foetal distress, early cord clamping is done and then the neonatologist takes the charge

THIRD STAGE : 
Hand placed over the fundus and look for signs of placental separation:    
1) Increase in fundal height
2) Gush of blood
3) Permanent elongation of umbilical cord
4) Suprapubic bulging (most important) 

The uterus may be massaged 
 
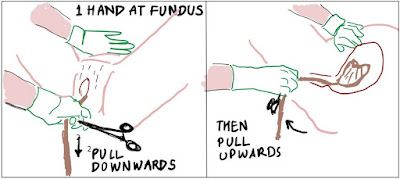
 • Placental expulsion is done by Brandt Andrews Method (Controlled cord traction) after signs of placental separation


(a) Apply traction on the part of the cord outside the vulva, first downwards with one hand supporting the fundus of the uterus (to prevent uterine inversion), and then guiding it upwards and out of the birth canal once separation has occurred. 
(b) Wrap the excess length of the cord coming out around the clamp. 
(c) Repeat (a).
 
• Once the placenta appears at the vulva, both hands are used to hold and twist it gently to ensure that all the membranes are delivered intact
 
• Inspect placenta to ensure no part is retained inside
 
• Check the tone of the uterus: Contracted uterus should feel rock solid 
 
• If the uterus is not contracting, then ask the sister to give Oxytocin. If this fails, 800-1000 µg of Misoprostol is given per-rectally. If this fails, Carboprost 125 µg is given i.m. Do keep in mind the contra-indications of the latter two. Even after all this if the uterus does not contract, call a senior immediately

Following this, the vulva and vagina are carefully inspected and repaired if necessary. 
 
Episiotomy is sutured in 3 layers using Chromic catgut (0) preferably or else Rapid Vicryl: 
1. Continuous interlocking suture is taken beginning from 1cm above the apex of vaginal mucosa till the muco-cutaneous junction
2. Simple interrupted suture for the muscle 
3. Vertical mattress suture or subcuticular for the skin 

Sterile pad is applied. 

 FOURTH STAGE: 
• The patient is shifted to the side room. She is allowed to take everything (solids/liquids) by mouth just like a normal patient
 • Record the following after 1 hour: Pulse, temperature, blood pressure, tone of the uterus to be monitored. Check episiotomy scar for vulval hematoma
• Look for abnormal vaginal discharge and excess bleeding
• She is instructed not to sit cross-legged but with the extended legs for the risk of wound gaping
• The patient is asked to go to the washroom and empty her bladder. This is to ensure that there is no urinary retention, after which she is shifted to the ward

Episiotomy wound care: metronidazole+ povidone ointment iodine / povidone iodine ointment is applied 4 times/day. For excess pain, lignocaine gel is given and the patient is advised sitz bath

She is prescribed the following antibiotics generally: 
a) Amoxicillin-Clavulinic acid 625 mg TDS
b) Metronidazole 400 mg TDS 
c) PPI (Pantoprazole40 mg) OD 
Usually the patient is discharged on the 3rd day
 
Written by our guest authors Konal Ahire, Mithil Rathod and Ayushi Gupta
Illustrations by Anveshi Nayan
#Ae(ONE)INTERN


Trigger Finger

Trigger Finger


REQUIREMENTS: consent, povidone-iodine, spirit, a needle of 16-18G and one needle of 25G, 3 ml syringe 


PROCEDURE: 
• Prepare the site in a sterile fashion with povidone-iodine solution
 
• Using a 16- or 18-gauge needle attached to the 3-mL syringe, draw up a combination of 0.5 mL of lidocaine and 0.25 mL of corticosteroid (either triamcinolone or betamethasone)
 
• Change to a 25-gauge needle
 
• Place the needle in the midline of the finger, through the finger flexion crease at the junction of the finger and hand, and angle it approximately 50° proximally, with the bevel of the needle facing proximally
 
• This places the needle distal to the A1 pulley in the hand and is far easier than inserting the needle right at the A1 pulley. Generally, there is much less tenderness distal to the lesion at the A1 pulley
 
• Advance the needle through both flexor tendons until it contacts bone. Slowly withdraw the needle, with forward pressure on the barrel of the syringe, until the resistance encountered by the needle is decreased, indicating that the needle is within the flexor sheath
 
• This injection should not require any force, and the solution should be quite easily injected into the flexor sheath
 

(With a 25-gauge needle, injection into the flexor tendon (as opposed to the flexor sheath) requires a very large amount of force. Thus, if the flexor sheath injection seems to require a great deal of force, it is likely that the needle is positioned inappropriately in the flexor tendon) 
 
• The provider often visualizes or palpates the tendon sheath filling during injection to confirm that the needle is placed well within the sheath
 
 • When the injection is complete, withdraw the needle slowly from the sheath, and place an adhesive bandage over the injection site
 
• The provider should warn the patient that he or she may note pressure in the finger during this step. Also, warn the patient that the area injected is likely to be tender and painful for a day or two. In addition, remind the patient that steroids take some time to have effect; often, patients wait 3-5 days to experience a difference in clinical symptoms
 
• Subcutaneous injections for trigger finger have also been described and have been shown to have effect. If the injectate escapes the sheath and subcutaneous fluid is seen, the injection may still have effect

TIPS & TRICKS: 
• Palpate the flexor sheath and mark the line with your thumb nail
• Get the patient to flex their fingers in and out if you are having trouble
• Clean with alcohol swab then no touch technique
• If the needle goes too deep it will hit the flexor tendon
• Do not injure the neurovascular bundle present on either sides of the flexor tendon
• Never inject against resistance
• Ask patient to gently move their fingers while injecting. If the syringe moves with movement of finger, it indicates that needle is in the flexor tendon

COMPLICATIONS: 
1. (Most common ) Recurrence of the triggering of the finger
2. Infection at injection site 
3. Flexor tendon rupture after corticosteroid injection 
 

Written by our guest author Rishabh Rawat
Illustrations by Anveshi Nayan
#Ae(ONE)INTERN

Corn removal

 Corn Removal

REQUIREMENTS:
Written informed consent, sterile gauze pieces, povidone-iodine, ethanol, sterile plastic drape, syringe with needle with local anaesthesia, scalpel with no.15 blade, artery forceps, toothed forceps, Babcock forceps, dressing material

PROCEDURE:
• Plantar aspect of foot is sterilized with help of betadine followed by spirit

• Anesthesia- local anesthesia, if required, depending on depth and size of corn

• Patient is sitting/ supine on OT table with knee extended

• PAIRING: The hyperkeratotic tissue surrounding and over the corn area is paired with no 20-24 sterile surgical blade till erythema or transition from hard to less tissue occurs


• Take a circular incision around the corn. Extend it conically inward till you reach the core. (The corn is triangular with base deep inside epidermis. Whole of it should be removed to prevent recurrence)

• With the help of artery or hemostat hold and pull the corn while extending the incision

• Apply betadine and peroxide gauze with pressure to control bleeding

• Dressing done with help of pressure bandage

Advice to patient:
• The patient is instructed to use soft foot wear
• Tetanus immunization and antibiotics as indicated
• Advice about dressing
• Salicylic acid lotion to be applied after 2 weeks or healing to prevent recurrence

 
Written by our guest author Nitish Garg
Illustration by Anveshi Nayan
#Ae(ONE)INTERN

Lacrimal sac syringing

Lacrimal Sac Syringing


REQUIREMENTS: Anesthetizing eye drops, 25G broken needle and another sterile needle, syringe with sterile normal saline, punctum dilator (used only when punctum opening is small) 

PROCEDURE: 
• Explain the procedure to the patient and take consent

• Anesthetize the using eye drops
 
• Aspirate 2 ml normal syringe by using a sterile needle attached to the syringe

• Then replace this needle with a broken 25G needle

• POSITION: The patient can be supine with the examiner at the head end of the patient or the patient can be in a semi-recumbent position
 
• Pull the lower lid downwards and outwards as this causes the eversion of eyelid and straightening of horizontal canaliculus. Identify the lower punctum in bright light
• Hold the 25G broken needle attached to syringe by right index and thumb and place it on the punctual opening

• Twist it with the light pressure and introduce into the punctum first in vertical direction (downward) 

• Then change it to horizontal direction and push it medially by rotator movement-following the course of the canaliculus (first vertically then horizontally)

• Now push the piston of syringe attached to the needle, and inject 1ml of saline into the canaliculus slowly (as fast injection may give false positive regurgitation test), and ask the patient if saline has reached his/ her throat. Alternatively, note the swallowing movement of the neck

INTERPRETATIONS: 
• Water is going freely into the throat - Lacrimal passage is patent

• Water is not going into the throat, instead, it is regurgitating through the upper punctum and partly through the same punctum: 

Common Canalicular Duct block: 
a) Soft Stop to needle 
b) Fast regurgitation 
c) Clear fluid coming out through the upper puncta generally 

Nasolacrimal Duct block: 
a) Hard Stop to needle 
b) Slow regurgitation 
c) Turbid fluid regurgitation (water is mixed with pus, mucus, mucopus or mucoid material) 

 • If little water is going onto the throat after forced syringing (some part is coming out through punctum), It is called partial nasolacrimal duct block


Written by our guest author Krishna Borse
Illustrations by Ayushi Gupta
#Ae(ONE)INTERN

Injection Techniques


Injection Techniques 


NEEDLE POSITION FOR ALL
The position depends on the age of the child, the site of injection, the number of injections to be given and convenience of vaccinator.


INTRAMUSCULAR INJECTION 


Preferred Site:
0-2 years: Anterolateral thigh
3 years old and above: Deltoid

(In children ages less than 15 months the deltoid muscle is not safe to use since it is not developed enough to absorb the vaccine and the radial nerve is close to the surface)


REQUIREMENTS:

Cotton, Antiseptic, 22-25 G needle, Syringe

PROCEDURE:

Child should be in mothers lap and mother holding hands of infant 


ADMINISTRATION: 

  • Use aseptic precautions

  • Hold the syringe barrel with fingers and thumb on sides of the barrel and with the bevel (hole) of the needle facing upwards

  • Pinch and gather the muscle mass by one hand

  • Stretch the skin over injection site

  • Insert needle at 90 degree

  • Aspirate to make sure a blood vessel is not punctured. DO NOT ASPIRATE WHEN YOU INSERT THE NEEDLE INTO THE INFANT FOR THE INJECTION. 

  • Depress the plunger smoothly, taking care not to move the needle under the skin

  • Pull the needle out quickly and smoothly at the same angle as it went in

  • Place a clean swab gently over the site

  • DO NOT RUB OR MASSAGE the injection site. Soothe and distract the infant

  • Discard everything according to biomedical waste rules


Dosage of Anti-Rabies Serum: 20 IU/kg, half at bite site and half intra-muscularly


SUBCUTANEOUS INJECTION 

The injection is given into the layer below the skin on the upper arm 


REQUIREMENTS:

Cotton, Antiseptic, 22-25 G needle, Syringe


PROCEDURE:

POSITION:

Child should be in mothers lap and mother holding hands of child and exposing upper arm of baby  


ADMINISTRATION:

  • Wash hand and wear sterile gloves  

  • Hold the syringe barrel with fingers and thumb on the sides of the barrel and with the bevel (hole) of the needle facing upwards

  • Quickly push the needle into pinched up skin at a 45degree angle

  • Direct it towards the shoulder of the child

  • Depress the plunger smoothly, taking care not to move the needle under the skin

  • DO NOT RUB OR MASSAGE the injection site. Soothe and distract the infant

  • Pull the needle out quickly and smoothly at the same angle as it went in

  • Place a clean swab gently over the site

  • Discard everything according to biomedical waste rules


 INTRADERMAL INJECTION  

BCG is the only vaccine that is injected intradermally (into the layers of the skin) for slow absorption. It is usually given in the left upper arm. To measure and inject the very small dose (0.05 ml) accurately, a special syringe and needle are used. 

POSITION:

 Cuddle position on caregiver’s lap (BCG recommended for infants only)


ADMINSTRATION: 

  • Hold the syringe barrel with fingers and thumb on the sides of the barrel and with the bevel (hole) of the needle facing upwards

  • Lay the syringe and needle almost flat along the infant’s skin

  • Insert the tip of the needle under the surface of the skin just past the bevel

  • Keep the needle close to the skin at the same angle as you inserted it

Place your other thumb on the lower end of the syringe near the needle to hold the needle in position, but do not touch the needle. 

Hold the plunger end of the syringe between the index and middle fingers. Press the plunger in slowly with the thumb. If you feel no resistance to the plunger, you are not in the right place and should reposition  

  • A pale flat-topped swelling with small pits like an orange peel should appear on the skin

  • Remove the needle smoothly at the same angle as it went in

  • The caregiver should place a clean swab gently over the site

  • DO NOT RUB OR MASSAGE the injection site. Soothe and distract the infant

  • Discard everything according to biomedical waste rules


REFERENCES:

http://www.who.int/immunization/policy/Immunization_routine_table2.pdf? ua=1 

https://vikaspedia.in/health/child-health/immunization


Written by our guest author Shreedhar Dhopat
Illustrations by Devi Bavishi
#Ae(ONE)INTERN 


Management of Cut and Lacerated open Wound (CLW)

Management of Cut and Lacerated open Wound (CLW)

INITIAL ASSESSMENT AND HEMOSTASIS:    
• Rule out life threatening conditions and ensure that the patient is vitally stable

• Do a local X-Ray (if indicated/for suspected injury) to rule out stone, soil, etc

• Upon presentation, a laceration should be evaluated, and the bleeding controlled using direct pressure or even ligation of bleeding vessels/ spurters (under local anesthesia), if needed. If it's an oozing wound/ bleeding copiously, use H2O2 and compress

DECONTAMINATION OF THE WOUND:    
• Thorough cleaning to be done, no dirt/blood should be left in the wound. Copious wound irrigation with normal saline with a 50 ml syringe and 18-gauge needle (sometimes done directly by punching a hole into the saline bottle and pressing it) which washes away foreign matter and dilutes the bacterial concentration to decrease post-repair infection
 
• Any visible foreign matter should be removed with forceps, and devitalized tissue removed with sharp debridement with scalpel or dissecting scissors to reduce the risk of infection
 
• Local anesthesia with lidocaine 1% is given (especially if suturing is required)
 
• After anesthetising the wound, clean again, more vigorously (as the patient will be more compliant now)

• Foreign bodies near blood vessels, nerves, and joints should be removed with caution, and referral to seniors should be considered
 
• Local hair should be clipped, not shaved, to prevent wound contamination   
    
REPAIR OF THE WOUND:       
  1. For clean wound, small wound - suturing can be done:    
• Deep, multiple-layer wounds should be repaired using absorbable, simple interrupted sutures. Most other wounds can be closed effectively with non-absorbable, simple interrupted suture
  
• Absorbable sutures, such as Vicryl, Dexon and Monocryl are used to close deep, multiple-layer lacerations (Usually, 3-0 nylon (Ethilon) on cutting bodied needle is used)

• In general, a 1–0 or 2–0 suture is appropriate on the trunk, 3–0 or 4–0 on the extremities and scalp, and 4–0 or 5–0 on the face

• The horizontal mattress technique may be the best option for closing wounds on fragile skin because it spreads the tension along the wound edge

• The vertical mattress technique is good for closing high- tension wounds. It is also used to evert wound edges in areas that tend to invert, such as the posterior neck or concave skin surfaces

Place a latex drain in deep oozing wounds to prevent hematoma formation
 
 
        2. For clean contaminated wound or large wound where suturing is difficult:
 
• Perform wound debridement and wound toilet: 
I. Wound debridement - removing all dead and devitalised tissue from the wound
II. Wound toilet - Cleaning skin surrounding wound with antiseptic and irrigation of would with saline
These steps favor wound healing by secondary intention

• Continue the cycle of surgical debridement and saline irrigation until the wound is completely clean

• Pack wound lightly with damp saline gauze and cover the packed wound with a dry dressing
 
Change the packing and dressing daily or more often if the outer dressing becomes damp with blood or other body fluids.   


For suturing techniques and debridement, please refer to the respective documents. 


Written by our guest authors Omkar Doiphode and Tushar Mahajan
#Ae(ONE)INTERN