Sunday, April 18, 2021

Endotracheal intubation


ENDOTRACHEAL INTUBATION


REQUIREMENTS:

Gloves, face shield, suction, Laryngoscope and blade, Endotracheal tube (of required size) with stylet, bag and mask apparatus, 10 cc syringe for checking air leak, oral or nasal airway, tape for holding the tube


PROCEDURE:

  1. Check the equipment before starting the procedure- if the light on the laryngoscope is functioning and check the ET tube for air leaks by filling it up with 10cc air (the balloon should be tense) Insert the stylet in the ET tube to give it proper form. Make sure the stylet doesn’t protrude outside the tube.


  1. Position the patient in the “sniffing” position- flexion at the neck and extension at the head.


  1. Place a pillow or towel roll under the occiput to elevate it. (It aligns the 3 axes- pharyngeal, laryngeal and oral to facilitate better visualisation of the vocal cords.)


  1. Pre-oxygenate if possible (1-3 min 100% Oxygen)


  1. Stand behind the head of the patient. The head of the patient should be at the lower end of your sternum. Open mouth and inspect: remove any dentures/debris, suction any secretions.


  1. Check for proper sedation by the laxity of jaw.


  1. Hold the handle in your left hand (non-dominant hand), blade down, pointing away from you. 


  1. Retract the lips with your right hand. 


  1. Insert the laryngoscope blade to the right of patient’s tongue. Gradually move the blade towards the centre of the mouth pushing the tongue to the left.


  1. Advance the laryngoscope gradually to visualize the epiglottis. 


  1. If MacIntosh- Place the tip of the blade into the vallecula between the base of the tongue and the epiglottis and lift anteriorly to expose the vocal cords.

If Millers- Place the tip of the blade just past the epiglottis and lift anteriorly to expose the vocal cords.


THE LIFT- When the tip of blade is properly positioned lift the laryngoscope upwards and forwards/away at a 45-degree angle. Direct the force of your lift along the axis of the laryngoscope handle in direction of the ceiling over the patient’s feet.


  1. Hold the preselected tube in your right hand like a pencil, curve forward. Pass the tube to the right of the blade, past the right side of the tongue. The tube should not obstruct the view of the vocal cords.


  1. Pass the tube through the vocal cords until the balloon disappears into the trachea. Remove the stylet and advance the tube until the balloon is 3-4cm beyond the vocal cords. The marking of the tube at the incisors will show 21-24cm when tube is in position 


  1. Remove the laryngoscope and inflate the balloon with 10cc air to prevent air leaking during ventilation. Attach the tube to bag and mask apparatus and ventilate.


  1. Place the end tidal CO2 detector. Colour change will be seen within first 6 breaths.


  1. Confirm the position of the tube by auscultating over the lungs and epigastrium. Listen for the presence and equality of breath sounds over both lung fields and for the absence of gurgling sounds over the stomach. (to check for accidental oesophageal intubation)


  1. If not in correct position deflate the cuff and remove the tube resort to Bag and Mask Ventilation, repeat the intubation process from the beginning. If the tube is in too far, the right lung will be ventilated only by the right main bronchus (decreased left lung breath sounds). Deflate the cuff and withdraw the tube 2-3 cm re-inflate the tube and recheck the position (symmetrical breath sounds)


  1. When the tube position is confirmed, tie it in place with cotton tape and attach it to the ventilating apparatus.


PRACTICAL TIPS AND TRICKS

  • When inserting the stylet give the ET tube a form of a “hockey stick”- 30-35-degree angle anterior before the balloon. If it’s too straight it risks oesophageal intubation and if too angled will get hung up on the vocal cords.


  • Grasp laryngoscope firmly but don’t clench your fist because this decreases control and causes early fatigue.


  • Wrist must remain rigid during laryngoscopy.


  • Keep your elbows in. Lift on a line connecting the patient’s head with the intersection of the opposite ceiling and the wall. It won’t be straight, but keeping your arm straighter and fairly rigid it gives you the strength of your shoulders to lift the head. It prevents you from using the teeth as a fulcrum — dangerous for the teeth. And it allows you to use binocular vision for depth perception.


  • With your shoulders relaxed and your arms by your sides you can lift the jaw easily without rotating the blade back onto the teeth.


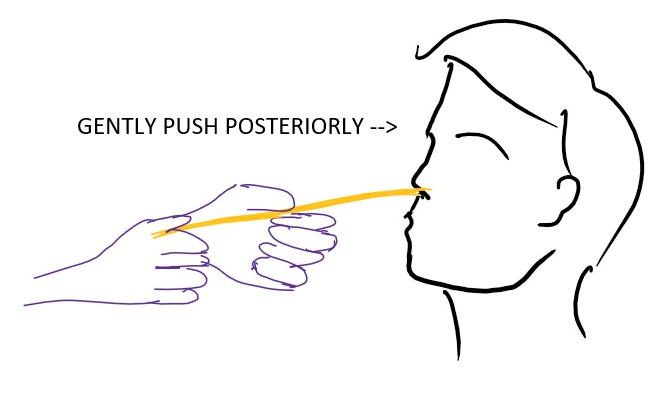
  • If vocal cords are not visualised- Perform the “Sellecks Manoeuvre” -apply cricoid pressure, make your assistant place their thumb on one side of the cricoid ring and their index or ring finger on the other. Pushing down firmly to force the cricoid forces the vocal cords downward and often into the field of view. It also compresses the oesophagus between the cricoid cartilage and the cervical vertebrae and prevents passive regurgitation of gastric contents.


  • Pass the tube into the larynx through the cords in one smooth motion. If the patient is breathing, time the forward thrust for inspiration when the cords are fully open. During expiration, the tube may bounce off the closing cords into the oesophagus.


REFERENCE LINKS:

1)NEJM link (Similar to steps written; 11:50 min video)

https://www.youtube.com/watch?v=t6q9Bys7QDk

2) https://www.youtube.com/watch?v=z6HMY9dhh2c (2:21 minute video)


Written by our guest author: Chitra Wadekar
Illustrations by Devi Bavishi
#Ae(ONE)INTERN


Nasogastric tube insertion


NASOGASTRIC TUBE INSERTION


REQUIREMENTS:

Verbal consent, Gloves, Fine bore nasogastric tube (feeding only) or nasogastric “Ryles” tube 16Fr (all other indications), lubricant, Syringe, Securing device (sticking), Cup of water (may be required) 


PROCEDURE:

  • Ask the patient to breathe in through each nostril separately to judge which is more patent.

  • For this procedure the patient should be positioned on the bed upright and facing forward (sniffing position). Put on your gloves.

  • Lubricate the tip of the tube and begin to insert through one of the nostrils keeping the tube posteriorly parallel to the floor of the nose. If any resistance is encountered change to the other nostril.

  • Once nasopharynx is reached, ask the patient to flex their head and swallow water/ saliva.

  • As they swallow advance the tube to the desired length.


  • At the end of the procedure, air filled syringe is attached and air is pushed in while auscultating at the epigastrium.

  • A swoosh/ pop sound confirms the location of tube in the stomach.

  • Fix the tube in place using sticking.


  • NOTE:

If the tube enters larynx the patient may gag or cough. Pause for a moment, withdraw slightly, ease the patient and then continue inserting it again.


For patients in supine position, slightly flex their neck while inserting the tube.

For unconscious patients, intubation in lateral decubitus has a higher success rate according to a pubmed article (https://pubmed.ncbi.nlm.nih.gov/28544238/).

PRACTICAL TIPS AND TRICKS:

1) A gentle curve can be created in the Ryle’s tube by winding it around our finger before insertion. Then while inserting the tube, let that slight curve point down.


VIDEO LINK:

https://youtu.be/1OakmxZDa5c 


Written by our guest authors: Ashish Gaikwad and Anveshi Nayan
Illustration by Anveshi Nayan
#Ae(ONE)INTERN


Nebulization


NEBULIZATION  

Nebulization can be delivered by a face mask or a mouth-piece. 


 PROCEDURE: 

  • Take all the aseptic precautions. 

  • Clean the mask with spirit. 


  • Add the measured amount of drug into medicine cup/ mixing chamber. 

(In neonates we usually give hypertonic saline for nebulization) 


  • Setup all the connections i.e:  

  1. Mask with the mixing chamber/ medicine cup 

  2. One end of air tube to outlet of the machine/ pipe 

  3. The other end of air tube with mixing chamber and mask 


  • Switch on the machine. 

  • Look whether fine mist is coming out through the mask. 

  • Place child in comfortable position (Head Upright), or in Mothers lap.

  • Put the mask to the face of child covering nose and mouth adequately. 

    Instruct the child to breathe in and out comfortably. 


  • Continue nebulization until fine mist is no longer present. 

  • Instruct the child to gargle or rinsing of mouth. 

  • Clean the machine after use with spirit and place it back in sterile/ clean pack. 

    REFERENCE VIDEO LINK: 

     https://www.youtube.com/watch?v=qK-RqSg566c&feature=youtu.be 


Written by our guest author: Manpreet Kaur
Illustrations by Anveshi Nayan
#Ae(ONE)INTERN


Spinal Anesthesia

Spinal Anesthesia

REQUIREMENTS:
Gloves, Povidone iodine, Spirit, Drape, Local anaesthesia kit, 18G needle, 25G dura splitting spinal needle, Bupivacaine/fentanyl/Lignocaine 

PROCEDURE:
PREPARATION: Clean skin of back with povidone-iodine followed by alcohol and
drape the back of patient.

POSITION: Given so as to increase the distance between two spinous processes.


SITE: It is given in midline @ L3-L4 or L4-L5 level (horizontal line passing between the 2 iliac crests passes through L4 spinous process)


PROJECTION & PUNCTURE:
• Local anesthesia should be injected at the site.
• An 18 G introducer directed 10-15 degree cephalad (because spinous processes are directed downwards from the spine) up to interspinous ligament is introduced and stabilized with one hand.
• With the other hand, a 25 G dura splitting spinal needle (with stylet) is then passed through the introducer till subarachnoid space is entered (recognized by 2nd 'loss of resistance' feeling).
• NOTE: Introducer may not be required for thin needles like 25G needle.
• Stylet is then removed and CSF appears at the hub.
• Syringe with local anesthestic is then attached to the spinal needle while
holding it stable.
• Aspirate to see free flow of CSF and then inject the drug.


DRUGS USED COMMONLY : Bupivacaine, Lignocaine, Fentanyl 

LEVEL OF ANAESTHESIA : Checked by pinching skin by forceps


PROBLEMS  FACED:
1)


If still no CSF appears, ask a senior.

2)


If blood clots in the needle, use another needle. 

3) If patient complains of sudden shooting pain in one leg (due to nerve injury by needle), move the needle medially.

Written by our guest authors: Krishna Borse and Anveshi Nayan
Illustrations by Anveshi Nayan and Ayushi Gupta
#Ae(ONE)INTERN

Distal Radius Fracture Reduction


Distal Radius Fracture Reduction 
 
  1. Get X-RAY WRIST AP and Lateral View 


  2. ANAESTHESIA- (Sometimes people don’t give any anaesthesia, which should be avoided)

2 Options: 

A. Hematoma Block 

-Locate fracture site
-Under sterile prepration using 20G needle Pierce and go deep
-Pull back to confirm fracture site (you will get blood)
-Inject 5-6 cc 1% lidocaine
-Wait for 10-15 min


B. Sedation


3)REDUCTION FOR COLLES

  • Hold the hand of patient as if "shaking hand". Dis-impaction of fragment: (by traction and counter-traction) 

  • Palmar flexion and ulnar deviation pronation (see pic) 

(it may be necessary sometimes to accentuate the fracture while applying traction to free the fragments before pushing it into place) 


4)CAST is applied with moulding (contrary to normal rule of immobilizing one joint proximal and one joint distal, the elbow joint is spared here as generally the patients are elderly) 

(while applying cast continuous traction is given by the assistant by pulling from finger) 

 Three-point moulding of cast

-1 hand at fracture site
-Other distal to fracture site on opposite side of wrist
-Assistant hand is applied at elbow

5) X-RAY to confirm the reduction and correction of dorsal and lateral tilt 

Repeat x-ray every week for first 3 weeks to detect re-displacement.


Written by our guest author -Pratik Mundada
Illustration by Devi Bavishi
#Ae(ONE)INTERN


Saturday, April 17, 2021

Cytomegalovirus mononucleosis signs/symptoms/clinical manifestations

 CMV mononucleosis signs/symptoms/clinical manifestations

I thought of turning it into a mnemonic! ABCDEFGH...

Timeline for USMLE for IMGs

BEST WAY TO PLAN YOUR USMLE JOURNEY

  • September 1st of every year is when ERAS starts accepting applications. The deadline usually is September 15th (except Match 2021 where it was Oct 21st and Match 2022 where it is Sept 29th)

  • This means you need to have all your documents and scores ready before September 15th.

  • ECFMG certification: This takes anytime between 7 days to 3-4 weeks to arrive from the day you apply for it.
    1. When can you apply for ECFMG certification: When you have all your step 1, 2 CK, and OET scores in hand + You have graduated medical school and your credentials are verified.
    2. Credential verification: Your medical school needs to send your degree and final transcript to ECFMG. This process can take between 1-4 weeks.
    3. There is usually a delay in score reporting that happens for Step 1 and Step 2 CK around May-June every year. Be on the lookout for that and plan accordingly. If there is no delay, your Step scores should come within 3-4 weeks of taking the test. 

Crescent-shaped gametocytes in P. falciparum malaria

The most definitive finding of P. falciparum that can be seen in a blood smear when viewed under a microscope is the shape of the gametocytes.

Here is my mnemonic for it.

Wednesday, April 14, 2021

Urinary Catheterisation

 URINARY FOLEY’S CATHETERISATION

• Wash hands and wear sterile gloves.
• Ask someone to put lignocaine jelly at the back of your left palm.


• Don’t touch any sterile field with your left hand.
• As the bulb of the penis is reached it should be gently rotated down in line with the patient’s body and catheter should be further advanced till the Y of catheter is at the level of urethral meatus.
• Wait for urine to drain.
 If no urine is draining:
a) Gently press supra-pubic region)
b) Aspirate via the urobag port using a sterile syringe.
c) Disconnect and reconnect the urobag and foley's catheter.

After visualization of urine return, inflate the distal balloon by injecting 20-30 ml of normal saline through the cuff inflation port. (Distilled water is preferred).
• Gently withdraw the catheter from the urethra until resistance is met (else excessive intravesical length of foley’s can cause it’s knotting and failure of removal).
• Reduce the foreskin (else paraphimosis can occur).


*For females, do not insert the whole length of foley’s as female urethral length is only around 4 cm.

• Keep the catheter and collecting tube free from kinking.
• Keep the collecting bag below the level of the bladder at all times. Do not rest the bag on the floor.


URINE SAMPLE COLLECTION FROM A CATHETERISED PATIENT

I) If a small volume of fresh urine is needed for examination (i.e., urinalysis or culture), clamp the catheter for sometime so that urine is collected in the catheter tube.

Disinfect the site of collection.

Remove the clamp


II) Obtain large volumes of urine for special analyses (not culture) aseptically from the drainage bag.


URETHRAL CATHETER REMOVAL

Use a syringe to empty the balloon, and then apply gentle traction. 


Written by our guest author - Anveshi Nayan

Illustrations by Anveshi Nayan

#Ae(ONE)INTERN