Tuesday, April 20, 2021

Injection Techniques


Injection Techniques 


NEEDLE POSITION FOR ALL
The position depends on the age of the child, the site of injection, the number of injections to be given and convenience of vaccinator.


INTRAMUSCULAR INJECTION 
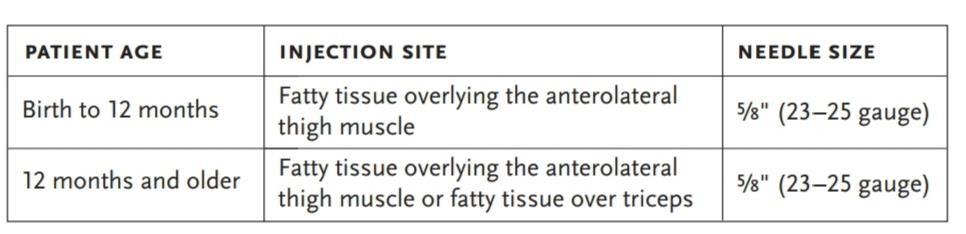

Preferred Site:
0-2 years: Anterolateral thigh
3 years old and above: Deltoid

(In children ages less than 15 months the deltoid muscle is not safe to use since it is not developed enough to absorb the vaccine and the radial nerve is close to the surface)


REQUIREMENTS:

Cotton, Antiseptic, 22-25 G needle, Syringe

PROCEDURE:

Child should be in mothers lap and mother holding hands of infant 


ADMINISTRATION: 

  • Use aseptic precautions

  • Hold the syringe barrel with fingers and thumb on sides of the barrel and with the bevel (hole) of the needle facing upwards

  • Pinch and gather the muscle mass by one hand

  • Stretch the skin over injection site

  • Insert needle at 90 degree

  • Aspirate to make sure a blood vessel is not punctured. DO NOT ASPIRATE WHEN YOU INSERT THE NEEDLE INTO THE INFANT FOR THE INJECTION. 

  • Depress the plunger smoothly, taking care not to move the needle under the skin

  • Pull the needle out quickly and smoothly at the same angle as it went in

  • Place a clean swab gently over the site

  • DO NOT RUB OR MASSAGE the injection site. Soothe and distract the infant

  • Discard everything according to biomedical waste rules


Dosage of Anti-Rabies Serum: 20 IU/kg, half at bite site and half intra-muscularly


SUBCUTANEOUS INJECTION 

The injection is given into the layer below the skin on the upper arm 


REQUIREMENTS:

Cotton, Antiseptic, 22-25 G needle, Syringe


PROCEDURE:

POSITION:

Child should be in mothers lap and mother holding hands of child and exposing upper arm of baby  


ADMINISTRATION:

  • Wash hand and wear sterile gloves  

  • Hold the syringe barrel with fingers and thumb on the sides of the barrel and with the bevel (hole) of the needle facing upwards

  • Quickly push the needle into pinched up skin at a 45degree angle

  • Direct it towards the shoulder of the child

  • Depress the plunger smoothly, taking care not to move the needle under the skin

  • DO NOT RUB OR MASSAGE the injection site. Soothe and distract the infant

  • Pull the needle out quickly and smoothly at the same angle as it went in

  • Place a clean swab gently over the site

  • Discard everything according to biomedical waste rules


 INTRADERMAL INJECTION  

BCG is the only vaccine that is injected intradermally (into the layers of the skin) for slow absorption. It is usually given in the left upper arm. To measure and inject the very small dose (0.05 ml) accurately, a special syringe and needle are used. 

POSITION:

 Cuddle position on caregiver’s lap (BCG recommended for infants only)


ADMINSTRATION: 

  • Hold the syringe barrel with fingers and thumb on the sides of the barrel and with the bevel (hole) of the needle facing upwards

  • Lay the syringe and needle almost flat along the infant’s skin

  • Insert the tip of the needle under the surface of the skin just past the bevel

  • Keep the needle close to the skin at the same angle as you inserted it

Place your other thumb on the lower end of the syringe near the needle to hold the needle in position, but do not touch the needle. 

Hold the plunger end of the syringe between the index and middle fingers. Press the plunger in slowly with the thumb. If you feel no resistance to the plunger, you are not in the right place and should reposition  

  • A pale flat-topped swelling with small pits like an orange peel should appear on the skin

  • Remove the needle smoothly at the same angle as it went in

  • The caregiver should place a clean swab gently over the site

  • DO NOT RUB OR MASSAGE the injection site. Soothe and distract the infant

  • Discard everything according to biomedical waste rules


REFERENCES:

http://www.who.int/immunization/policy/Immunization_routine_table2.pdf? ua=1 

https://vikaspedia.in/health/child-health/immunization


Written by our guest author Shreedhar Dhopat
Illustrations by Devi Bavishi
#Ae(ONE)INTERN 


Management of Cut and Lacerated open Wound (CLW)

Management of Cut and Lacerated open Wound (CLW)

INITIAL ASSESSMENT AND HEMOSTASIS:    
• Rule out life threatening conditions and ensure that the patient is vitally stable

• Do a local X-Ray (if indicated/for suspected injury) to rule out stone, soil, etc

• Upon presentation, a laceration should be evaluated, and the bleeding controlled using direct pressure or even ligation of bleeding vessels/ spurters (under local anesthesia), if needed. If it's an oozing wound/ bleeding copiously, use H2O2 and compress

DECONTAMINATION OF THE WOUND:    
• Thorough cleaning to be done, no dirt/blood should be left in the wound. Copious wound irrigation with normal saline with a 50 ml syringe and 18-gauge needle (sometimes done directly by punching a hole into the saline bottle and pressing it) which washes away foreign matter and dilutes the bacterial concentration to decrease post-repair infection
 
• Any visible foreign matter should be removed with forceps, and devitalized tissue removed with sharp debridement with scalpel or dissecting scissors to reduce the risk of infection
 
• Local anesthesia with lidocaine 1% is given (especially if suturing is required)
 
• After anesthetising the wound, clean again, more vigorously (as the patient will be more compliant now)

• Foreign bodies near blood vessels, nerves, and joints should be removed with caution, and referral to seniors should be considered
 
• Local hair should be clipped, not shaved, to prevent wound contamination   
    
REPAIR OF THE WOUND:       
  1. For clean wound, small wound - suturing can be done:    
• Deep, multiple-layer wounds should be repaired using absorbable, simple interrupted sutures. Most other wounds can be closed effectively with non-absorbable, simple interrupted suture
  
• Absorbable sutures, such as Vicryl, Dexon and Monocryl are used to close deep, multiple-layer lacerations (Usually, 3-0 nylon (Ethilon) on cutting bodied needle is used)

• In general, a 1–0 or 2–0 suture is appropriate on the trunk, 3–0 or 4–0 on the extremities and scalp, and 4–0 or 5–0 on the face

• The horizontal mattress technique may be the best option for closing wounds on fragile skin because it spreads the tension along the wound edge

• The vertical mattress technique is good for closing high- tension wounds. It is also used to evert wound edges in areas that tend to invert, such as the posterior neck or concave skin surfaces

Place a latex drain in deep oozing wounds to prevent hematoma formation
 
 
        2. For clean contaminated wound or large wound where suturing is difficult:
 
• Perform wound debridement and wound toilet: 
I. Wound debridement - removing all dead and devitalised tissue from the wound
II. Wound toilet - Cleaning skin surrounding wound with antiseptic and irrigation of would with saline
These steps favor wound healing by secondary intention

• Continue the cycle of surgical debridement and saline irrigation until the wound is completely clean

• Pack wound lightly with damp saline gauze and cover the packed wound with a dry dressing
 
Change the packing and dressing daily or more often if the outer dressing becomes damp with blood or other body fluids.   


For suturing techniques and debridement, please refer to the respective documents. 


Written by our guest authors Omkar Doiphode and Tushar Mahajan
#Ae(ONE)INTERN

Wound Swab collection

Wound Swab collection 

 
REQUIREMENTS: 
 ● Labelled sterile transport bottle/ test-tube (patient's details, site of the wound, date should be mentioned) 
● Swab and transport media
● Sterile normal saline 
● Antiseptic solution 
● Dressings 

PROCEDURE: 
 ● Follow universal precautions and aseptic precautions

PREPARATION OF WOUND: 
 ● For dirty contaminated wound before taking the swab, cleanse the wound thoroughly with sterile normal saline. A kidney tray can be placed below to collect the irrigating fluid
● Use sterile gauze to remove excess saline from wound surface
● If the wound is dry slightly moisten with sterile saline
● DO NOT USE ANY ANTIMICROBIAL CLEANSING SOLUTION BEFORE TAKING THE SWAB TO AVOID FALSE NEGATIVE REPORT

SWABBING: There are two methods for obtaining the swab:
● Levine method: for this 1 sq.cm area of viable wound bed tissue must be visible. Rotate the tip of the swab over 1 sq.cm area of viable tissue for 5 seconds. Use sufficient pressure to extract fluid from the wound tissue. If 1 sq.cm viable wound bed tissue is not visible then the swab cannot be collected. Debridement is required before swab can be collected. This technique is better then Z technique. 

● Z technique: move the swab in a zig-zag motion across the wound, while rotating the swab between the fingers.

DO NOT TOUCH THE WOUND EDGES AND PERIWOUND SKIN WITH THE SWAB
● Put the swab in the transport medium bottle/ empty sterile test-tube as indicated for microscopy, culture and sensitivity. 
● Remove the gloves, perform hand hygiene. Put on new sterile gloves
● Apply proper dressing over the wound
● Remove the gloves, perform hand hygiene 
● Fill the microbiology form with clinical details
● Send the sample and form to the laboratory as soon as possible.
 
 
Written by our guest author Shrinivas Surnar
Illustrations by Ayushi Gupta
#Ae(ONE)INTERN 
 

Subcutaneous Anesthesia

Subcutaneous Anesthesia (Local Anesthesia)

 
REQUIREMENTS:
Appropriate consent for the procedure to be performed, betadine solution, spirit, 2 sterile needles (Blue 23 G and Purple 25G), 2 ml or 5 ml syringe, 2% lignocaine

PROCEDURE:
• Sterilize the incision site with betadine solution followed by spirit (or as indicated)

• Use blue needle for removing the anesthetic agent out of the bottle. Change the needle to the purple needle. Bend the needle used for injecting the anesthetic agent. (This technique is commonly followed so that we do not go very deep but it's not recommended because it increases risk of needle stick injury to healthcare providers) 

• Inject syringe loaded anesthetic agent subcutaneously at angle of 10-15 degrees, at planned incision site (or just lateral to wound), making sure the syringe bevel faces upwards
 
In case of a wound, the anesthetic may be given from the inside part of a clean wound after thorough cleaning of the wound so that we need not pierce the patient any more


• Aspirate to see that blood vessel has not been entered into

• Slowly inject the agent while withdrawing the needle simultaneously, noticing the rise in skin surface over the area of infiltration

Another method: 
Inject a small amount of anesthesia at the site of entry of needle before insertion of the whole needle inside the skin. Then, via the bleb created the needle is further advanced. This may slightly reduce the pain while injecting. 

 
VIDEO LINK:

 
Written by our guest author Nitish Garg
Illustration by Ayushi Gupta
#Ae(ONE)INTERN 
 

Below Knee Amputation stump bandaging

Below Knee Amputation stump bandaging 
 
• Use an Elastic Bandage
 
• Start from Lateral Tibial condyle

• Bandaging diagonally across the stump to the medial distal corner

• Anchor with two fixing circular turns

• Continue with figure of 8 bandaging on BK stump

• Extend it upwards across knee and fix it above the knee joint at mid-thigh level with circular turns


Written by our guest author Bhakti Vijaykumar Dongare
Illustrations by Anveshi Nayan
#Ae(ONE)INTERN 

Above Knee Amputation stump bandaging

Above Knee Amputation stump bandaging
 
• With an elastic bandage, go around the waist to anchor it
       
• Extend it to the stump too

• Use another roll of elastic bandage, cover the stump

• Secure with two fixing circular turns

• Continue with figure of 8 bandaging

• Fix the bandage near the groin region.


Written by our guest author Bhakti Vijaykumar Dongare
Illustrations by Anveshi Nayan
#Ae(ONE)INTERN 

Lipoma Excision


Lipoma Excision
 
REQUIREMENTS: 
Written Informed Consent, Sterile gauze pieces, Povidone-iodine, Ethanol, sterile plastic drape, Syringe with needle with local anaesthesia, Scalpel with no.15 blade, Artery forceps, Needle holder, toothed forceps, Babcock forceps, suture, Dressing material 

PROCEDURE:
• The skin is cleansed with povidone-iodine followed by spirit (or any alternate disinfectant) and the site is draped by a sterile plastic drape and a window is made in it.
 
• Local anaesthesia is obtained with 2% lidocaine with or without epinephrine. 

• Linear incision along Langer's line (vertically on the limbs and horizontally on the trunk) is performed with no. 15 blade until lipoma is visualized. 

• Artery is used to bluntly dissect around the lipoma to break all soft tissue connections (under and around it).

• Most lipomas require minimal dissection. Some chronic and multi-lobulated ones may require dissection. 

• Once separated, lipoma is expressed by digital pressure to the edges of the mass. Lipoma 'pops' out. 
• Babcock forceps may be used to provide traction to facilitate its removal. 

• Incision closed with simple interrupted sutures. 

• It is cleaned and sterile dressing is applied. 

• Advice to patient: Keep the wound dry. Alternate day dressing. Analgesics to be taken SOS. Antibiotics and Tetanus immunization when indicated. 

• Send the specimen for histopathological examination. 

PRACTICAL TIPS AND TRICKS : 
Incisions should be made with the belly of blade. 


Written by our guest authors - Shrishti Patil and Anveshi Nayan
Illustrations by Anveshi Nayan
#Ae(ONE)INTERN

Venepuncture (Blood collection)

 Venepuncture (Blood collection)
 
REQUIREMENTS: 
Cotton, ethanol, Syringe (size according to the amount of blood to be collected), needle (blue 23G or purple 24G), Vacutainers 

PROCEDURE: 
• Take verbal consent of patient. 
• Follow universal precautions. 
• Ask patient if blood had been collected recently. If yes, try to avoid that site. 

Contraindications of venepuncture from a particular site:
1) IV fluids being given to the patient at the same time 
2) local signs of infection 
3) Haematoma 
4) fistula (created for dialysis)
- Paralyzed is avoided 

• Hand of the patient should be supported. 
• Apply tourniquet (generally a glove is used to tie around the arm instead) and ask the patient to open and close the fist a few times (for congestion of vein). 
• Do not tap the veins. 
• Palpate for vein (For direction and course of vein).
 • Clean the area with cotton and alcohol in a circular motion from in-to-out without re-cleaning the area once it has been cleaned. 
• Do not re-palpate.


• Stretch the skin with non-dominant hand and pierce the skin with the needle (with bevelled end facing up) at an angle of 20 degree. 
• Aspirate the blood into the syringe.  
• Before removing the needle, untie the tourniquet (it helps to reduce the blood loss after retracting the needle)

• Remove the site. 
• Recap needle while putting pressure with the help of cotton swab on it by placing the cap on a surface and then insert needle attached to syringe inside the cap (Recapping is generally not advisable but commonly practised). 
• After capping it properly, remove the needle along with its cap. 
• Then push the blood from the syringe into prelabelled vacutainers by removing their covers. 
• Thank the patient for cooperation.


To collect venous blood for venous blood gas analysis, when heparin isn't available, do the following:
1) Collect blood in green vacutainer
2)Attach a new needle to the syringe
3)Aspirate blood from the vacutainer

FOR BLOOD CULTURE: 8-10ml blood is drawn into the syringe through a sterile needle and then pushed out into a blood  culture bottle containing the transport medium. 
The specimen is refrigerated immediately (although immediate transport of specimen to laboratory is preferred.) 

VIDEO LINK:
 
Written by our guest author - Abhishek Ganacharya
Illustrations by Anveshi Nayan
#Ae(ONE)INTERN


Lumbar Puncture

Lumbar Puncture

REQUIREMENTS:
Written Informed Consent, Gloves, Skin prep and Drape, Local anaesthesia kit, 20 or 22G styletted spinal needle, Collection tubes

PROCEDURE:
• Follow universal precautions and explain the procedure to the patient.
• POSITION: Given so as to increase the distance between two spinous processes.


• Antiseptic is applied at the puncture site from centre to outwards. 
• Local anaesthesia 2% lignocaine given (without epinephrine to avoid cord infarction). 
 A needle with stylet directed 10-15° cephalad, pointing towards patient's umbilicus (because spinous processes are directed downwards from the spine) 

Location: It is given in midline @ L3-L4 or L4-L5 level (horizontal line passing a between the 2 iliac crests passes through L4 spinous process)


• Keep the bevelled end up and in the midline.
• As soon as the dura is pierced a pop-up sensation or sudden loss of resistance is felt. 
• Withdraw stylet gradually. 
• CSF collection CSF comes out drop by drop. Collect it in 4 different sterile tubes for biochemical, microbiological, cytological and other tests respectively.

• After the procedure, insert the needle back in the cannula, withdraw the entire assembly. Apply a gauze, put a tight dynaplast. 
Ask the patient to be in supine position for 10-15 minutes. 

TIPS & TRICKS :
Before the antiseptic solution, there is a technique to mark the exact point of the LP. Identify the iliac crest, come medially→Mark/Indent the skin with the back of the needle cover→ then sterilize. 

After sterilizing, you can't palpate the iliac crest because that part is not sterile. 

So, either wear 2 pair of sterile gloves with sterile technique or wear 1 pair→do the sterilizing bit→then wear another pair. (don't touch the stylet with unsterile gloves) 

PROBLEMS FACED: 
1)

If the CSF still doesn't come, ask a  senior. Patient's BP may be low. If so,  give one pint normal saline, full flow after. Keep the needle at the same place (do not remove the needle), repeat the procedure after 10 minutes.

2)
If blood clots in the needle, use another needle. 

3) If patient complaints of sudden shooting pain in one leg (due to nerve injury by needle), move the needle medially. 

4) When you hit a bone, go down then sideways. While manipulating, especially while coming out, do it by slightly rotating the needle, and stopping briefly. Don't directly pull it. 

5) Guarded LP: when the CSF flow is very fast 


Written by our guest author - Aakib Sohil Ghori
Illustrations by Anveshi Nayan
#Ae(ONE)INTERN

Monday, April 19, 2021

Trail's Sign

Shift of trachea produces prominence of sternal head of sternocleidomastoid on the side to which the trachea is shifted. It is called Trail's sign.


The pretracheal fascia encloses the clavicular head of stemomastoids muscle on both sides. When the trachea is shifted to one side, the pretracheal fascia covering the stemomastoid muscle on that side relaxes, producing the clavicular head more prominent on the side of tracheal deviation.