Thursday, May 6, 2021

Mechanical Ventilation- Physiology

Mechanical Ventilation- Physiology


  • Non-Invasive Ventilation is of two types:

  1. CPAP = Continuous Positive Airway Pressure: where continuous pressure is exerted during inspiration and expiration 

  2. BiPAP = Bilevel Positive Airway Pressure: where higher pressures are applied during inspiration and lower pressures during expiration


  • Use of CPAP 🡪increases intra-thoracic pressure 🡪 decreases Venous Return (VR) 🡪 decreased Right Ventricular (RV) preload.

  • PEEP > CVP 🡪 Preload decreases

  • PEEP > PAP 🡪 Afterload decreases (where PEEP = Positive end expiratory pressure, CVP = Central venous Pressure, PAP = Pulmonary arterial pressure)

  • Cardiac Transmural Pressure = pressure difference between inside of the heart and intrathoracic pressure. When CPAP is given, intrathoracic pressure increases 🡪 transmural pressure decreases 🡪Afterload decreases


  • CPAP: Increases inspiratory flow 🡪 Increases Tidal Volume (TV) 🡪 helps in unloading the inspiratory muscles to decrease work of breathing 🡪decrease dyspnea


  • Increase in expiratory pressure (like with CPAP) in patients with COPD helps in increasing ventilation and oxygenation. This might seem contradictory (how does increased pressure from the ventilator into the lungs during expiration help in increasing ventilation. It seems counter intuitive!). In order to understand this, think about how PURSED LIP breathing in COPD patients actually help them to breathe better!


  • COPD patients need an additional external PEEP in addition to inspiratory support to improve diaphragmatic function.


  • PRE-OXYGENATION: with 100% O2 for at least 3 minutes helps to prolong the apnea time (Apnea time = time to reach 88 to 90% SpO2). The FRC (functional residual capacity) is the reservoir during the period of apnea. 


  • LUNG INFLATION

  1. Moderate inflation: pulmonary stretch receptors reduce vagal stimulation 🡪 moderate tachycardia

  2. Hyperinflation: Stimulates Pulmonary C and J receptors 🡪 increased vagal signaling 🡪 bradycardia


  • LUNG PROTECTIVE VENTILATION
    - Low Tidal Volume
    - High PEEP (to keep lungs open, prevent alveolar collapse)
    - Low plateau Pressure


  • Esophageal Balloon: Can help in measuring pressures to deliver adequate PEEP and TV.


  • AUTO PEEP
    -Auto PEEP is the difference between alveolar pressure and the pressure at the proximal airway.
    -At the exact end of expiration, ideally, we expect the pressure in the alveoli to be zero as all air should have exited from the alveoli. But when some gas is retained, it leads to the development of Auto PEEP.
    -Auto PEEP is measured by end expiratory hold maneuverer.
    -If elastic forces are high and resistive forces (eg resistance in bronchi etc) are low, auto PEEP is minimal or absent.
    -Increase in resistive forces 🡪 passive exhalation time increases to ensure complete emptying of expiratory tidal volume.


  • TIME CONSTANT:
    -Time required for lungs to expire 63% of initial volume during expiration.
    -So total of 3 time constants would be needed to exhale 96% of TV out.
    -So, if we keep Inspiratory: Expiratory time as 1:3, Auto PEEP would not occur.
    -Diseases lung is inhomogeneous and can have different time constants for different parts 🡪 Expiratory flow limitation.
    -Flow limitation = dynamic condition that occurs when gas flow cannot be increased by increasing alveolar pressure or reducing airway opening pressure.


  • Dynamic hyperinflation is not the same as air trapping
    -In Asthma, inspiratory activity continues into early expiration 🡪 dynamic hyperinflation, without air trapping
    -In Recumbent obese patients, air trapping occurs without dynamic hyperinflation.


  • TRACHEOSTOMY
    -Increased risk of infection as compared to Endotracheal Tube (ET) because:
    1. Lack of humidification
    2. Absence of cough, hence decreased clearance of secretions
    3. Reduced ciliary function
    -Reduced work of breathing as compared to ET because:
    Tracheostomy tubes are smaller, more rigid 🡪 less turbulent airflow 🡪 reduces expiratory flow limitation, dynamic hyperinflation, auto-PEEP 🡪 reducing work of breathing

Written by Amrin Kharawala

Saturday, May 1, 2021

Lyme's disease - a review

 Hi!

Lyme's disease/ Lyme borreliosis

A patient with a typical history of frequent visits to the woods with bull's eye rash, neurologic features, cardiac abnormalities, and musculoskeletal features.

Tuesday, April 27, 2021

SURGICAL DEBRIDEMENT

REQUIREMENTS: Written Informed Consent, Sterile gauze pieces, Saline, Sterile working surface (A plastic drape is generally spread over the table), Syringe with local anaesthesia, Scalpel with 15 no. blade with toothed forceps   (or a sharp curette), Sterile gauze pieces and dressing

1)    Local anesthesia (may not be required for diabetic ulcer as it is painless)

2)    Use saline/ antiseptic solution to irrigate the wound (betadine solution is better avoided as it hampers wound healing)

3)    Using all aseptic precautions remove the dead tissue using 15 no. blade and toothed forceps

4)    Use short even strokes with minimal pressure (swapping movements) to avoid injury to underlying structures and minimize any bleeding that might occur.

-All devitalized tissue must be excised until bleeding occurs

-Muscle that is pale or dark in colour, does not contract on pinching and does not bleed on cutting must be removed

-Try to scrape superficially at the edge of ulcer as this is where the healthy tissue grows

5)    The wound is covered up with either wet or dry dressing

6)    Advice to patient: 

No weight bearing on the wound

Reassess and dress as required

Tetanus immunization and antibiotics as indicated


Written by our guest author Pratik Mundada
#Ae(ONE)INTERN

Lone Atrial fibrillation mnemonic

 "lone AF"

Mnemonic - "P- LONE"

  • Paroxysmal & Persistent or Permanent 

  • Less than 60 years of age 
  • Low  risk of systemic embolization

  • have a CHA2DS2-VASc score of 0

N

  • No evidence of cardiopulmonary or structural heart disease.   
  • No anticoagulant therapy is not indicated.

  • Keep an Eye on it , no additional treatment is required.
Thank you!

Monday, April 26, 2021

Menkes disease and Wilson's disease - DDx

 Hi!

Okay so maybe they are the two of the options for a patient's clinical scenario question and you have a blurred memory for which is which in context to copper metabolism?

Let's clear the basic facts here...

Saturday, April 24, 2021

Ampicillin-rash in infectious mononucleosis

 Hi!


Penicillins such as amoxicillin and ampicillin are currently not recommended in patients with infectious mononucleosis with bacterial secondaries (streptococcal tonsillo-pharyngitis). Why?

Wednesday, April 21, 2021

The Indian Intern

Hi! 🤠
While doing procedures as interns, it is difficult to look for concise sources to know how-best-to-do-it.
With the time constraints some details may be missed.

So, we, students of 2016 batch Seth GSMC and KEM Hospital, Mumbai, India have tried to compile information regarding such procedures (both basic and some that we may get a chance to perform).
Reliable sources and tips from our seniors and resident doctors have been used.

With limited resources in India, we can definitely do with a Freakshake🥤 of practical hacks and standard procedures😉🙃

PS: This is meant to COMPLEMENT, and not REPLACE practical skills to improve patient care

From continued efforts of 

Anveshi Nayan (CNS)

Ayushi Gupta (CVS)

Devi Bavishi (MSK)


Here is a list of all the procedure with their links, so you can directly access them from here.

Bookmark this page and Happy learning :)!

BASIC PROCEDURES:

  1. Venepuncture
  2. Arterial puncture
  3. IV cannulation and IV infusion
  4. Nasogastric tube insertion
  5. Injection techniques
  6. Nasopharyngeal and Throat swab collection
  7. Wound swab collection
  8. Urinary Catheterization

MEDICINE
  1. Central Venous catherisation
  2. Ascitic paracentesis
  3. Thoracocentesis
  4. Lumbar Puncture

SURGERY
  1. Steps common to all minor procedures
  2. Basic principles of bandaging
  3. AK Stump Bandaging
  4. BK Stump bandaging
  5. Head bandaging
  6. Magnesium sulfate and glycerine dressing
  7. Management of Cut and Lacerated Wound (CLW)
  8. Debridement
  9. Maggot removal
  10. Corn removal
  11. Lipoma excision
  12. Excision of Sebaceous cyst
  13. Incision and Drainage
  14. Suturing techniques
  15. Suture and stapler removal
  16. Surgical scrubbing
  17. ICD insertion
  18. Toe nail removal
  19. Preoperative surgical patient preparation

ORTHOPEDICS
  1. Distal radius fracture reduction
  2. Slab application
  3. Plaster removal
  4. Trigger finger
  5. Reduction of anterior dislocation of shoulder

ANESTHESIA
  1. CPR
  2. Spinal anesthesia
  3. Endotracheal intubation
  4. Subcutaneous (local) anesthesia

OBGY
  1. Normal Labor
  2. Pap smear
  3. Cardiotocography
  4. Contraception - CopperT


PEDIATRICS

  1. Mantoux test 
  2. Nebulization


HEMATOLOGY

  1. Blood donation
  2. Blood product transfusion


OPHTHALMOLOGY

  1. Schirmer's test
  2. Automated perimetry
  3. Lacrimal sac syringing
  4. Tonometry


OTORHINOLARYNGOLOGY

  1. Ear syringing

FORENSIC MEDCINIE

  1. Medicolegal Case


DERMATOLOGY

  1. Skin tag removal
  2. Skin biopsy

BLOOD PRODUCTS TRANSFUSION


PRE-REQUISITES & PROCEDURE: 
• In emergency lifesaving conditions, blood is issued without replacement after recommendation from treating doctor/ authorized person. 

• For high risk patients, attendants are told to arrange blood in advance. 

Prior to requesting the transport of blood products, ensure: 
• The physician orders for transfusion have been documented. 
• Informed consent has been obtained. 
• Blood is received from established blood banks only against a requisition form along with the sample for grouping and cross-matching, duly signed by the medical staff. 
• Staff nurse/attendant collects blood components from blood storage, transports blood component in insulated container to location and delivers it to nurse in charge. 
• Inspect for abnormal color, cloudiness, clots and excess air. 
• Check with compatibility slip to ensure that the following information on the unit of blood is same as that on the blood compatibility: 
✓ Blood unit number 
✓ Collection Date 
✓ Expiry Date 
✓ ABO blood group and Rh group 
✓ Patient's name matching with the requisition slip /case file 
✓ No. of units supplied 


• Blood is warmed


• The patient has an IV line (usually a pink one) established with saline. (First take an IV set. Seal open one port in blood bag. Put one end of IV set in bag. Remove the air from the tube by filling with blood and then administer.)


RATE OF TRANSFUSION
✓ For Adults: Start with 1mL/min. If no  reaction, increase to 4mL/min after 15 min. 

✓ For Pediatric transfusion: Advice  taken from treating physician.


MONITORING: 
• Take 3-4 readings of HR, BP, RR and Temperature (preferably every 15 min) for monitoring for the Blood Transfusion reactions. 

• If anything abnormal happens, Immediately stop the transfusion and call a senior. 

• Blood and blood bags are discarded as per BMW policies.


Written by our guest author Ayushi Gupta
Illustrations by Anveshi Nayan
#Ae(ONE)INTERN


Throat swab and Nasopharyngeal swab


REQUIREMENTS: Swab & transport media, Tongue depressor, PPE (Non- sterile disposable gloves, N95, Face Shield, gown)


PROCEDURE: 
● Follow universal precautions
● Open the packet containing swab and the viral transport medium containing bottle and write patient's details on the bottle label in capitals
Remove the swab stick, holding it at the end of the stick

FOR THROAT SWAB: 
● The patient should sit in front of adequate light source with head tilted backwards. Stand in front of the patient. Ask the patient to open his mouth wide and say 'AH'.
● Gently depress the tongue with tongue depressor so that throat is well exposed.
● Press the swab firmly with a slight rotational movement for at least 30 seconds over the back of the throat  
● AVOID TOUCHING THE TONGUE CHEEKS OR LIPS WITH THE SWAB 


FOR NASPHARYNGEAL SWAB: 
● Ask the patient to clear nose of any secretions
● Ask the patient to tilt back the head to about 70 degrees
● Insert the swab along nasal septum just above the floor of nasal passage till a resistance is felt
● Rotate the swab against the mucosa for minimum 10-15 seconds (30 seconds if possible). 
Collect sample from one nostril only if the swab gets adequately soaked by secretions. If not, collect sample from both the nostrils

●For covid-19 suspect, to send for RAT only nasopharyngeal swab is required and for RT-PCR both oropharyngeal and nasopharyngeal swab
● Both the swabs should be put into transport medium tube immediately and push the swab to the bottom
●The swab stick may have to be broken (at given marking) to fit into test tube containing transport medium
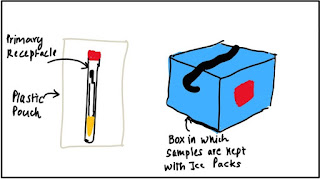
● Put these tubes in a primary receptacle
● This may be covered with absorbent material (cotton/ paraffin)
● This is then put in a zip lock pouch
● Put in a box containing ice pack


● Place forms and samples separately 
● Wash hands with soap and water and dispose remaining things in proper bags

VIDEO LINK: 

NASOPHARYNGEAL SWAB: https://youtu.be/DVJNWefmHjE  

Written by our guest author Shrinivas Surnar
Illustration by Ayushi Gupta and Anveshi Nayan
#Ae(ONE)INTERN

HEAD BANDAGING

1) Put dressing on wound of the patient

2) Using a Roller Bandage (crepe or cotton bandage, 4-6 inch size), roll the bandage on the anchoring side first

Anchor: It is the first turn of roll to support the bandage 
i) For wound on top of head, side of head, ears, cheek or chin-around forehead and back of head 

ii) For wound on forehead and back of the head-around chin and top of head


3) First loose end of bandage should be untucked and ask patient or relative to hold this first loose end

4) Roll the bandage around the forehead and back of head for two rounds

5) Then cross the bandage by first loose end, continue by bandaging on pressure pad on tops of the head and through chin


6) Finish up the rolling and tie up the other end with the first end, and tuck the loose end


Written by our guest author Varad Chandak
Illustrations by Varad Chandak
#Ae(ONE)INTERN

BASIC PRINCIPLES OF BANDAGING AND BANDAGING A LIMB


TYPES OF BANDAGES:  


Roller Bandage is used in the procedures mentioned below. 
It may be a gauze roller bandage or an elastic bandage. 

1.


Figure: The correct method to unravel the bandage (keeping the roll above the unraveled part of the gauze) 

2. Patient should be in a comfortable position and you should stand in front of the patient

3. Assess the capillary refill time always after bandaging (to ensure that it not too tight and circulation is maintained)

4. To secure the ends while using a roller gauze bandage: 


SPIRAL BANDAGING 
It is a common technique used for bandaging arms and legs

PROCEDURE: 
1) Anchor the bandage using 2 turns, usually below the injury

2) Then wrap bandage upward around the limb in a spiral pattern, overlapping half of the width of the bandage with the previous turn

3) Continue bandaging till injury is well covered

When bandaging a wound which is bleeding, place a thick gauze piece over the wound, which may be soaked in an antiseptic solution. Then cover the part of injury and surrounding limb using spiral bandaging. This is called 'Pressure bandaging'. 


REVERSE SPIRAL BANDAGING 
It done at sites where the diameter of the part to be bandaged varies (example: legs, forearm). It holds on to the particular site snugly. 

PROCEDURE:
1) Anchor the bandage with 2 turns, below the injury

2) Then wrap the bandage upwards in a spiral pattern for half a turn (till you have reached mid-point of extensor surface of your forearm

3) Then twist the roller bandage while keeping a thumb at the mid-point of extensor surface of forearm

4) Continue doing so, while overlapping half the breadth of roller gauze with each new turn


CIRCULAR BANDAGING 
1) Anchor the bandage using 2 turns, usually below the injury

2) Then wrap bandage upward around the limb in a circular pattern, overlapping half of the width of the bandage with the previous turn

3) Repeat it till the whole injury or part to be bandaged is covered

*While taking multiple circular turns at a particular place (the width of which is almost equal to the width of bandage), the gauze piece may be twisted once after every few rounds so that the bandage holds in place. 


FIGURE OF EIGHT BANDAGING 
It is done across a joint. It stabilises the joint while allowing movement. 

POSITION: 
• Elbow joint: Flexed at around 90 degrees
• Wrist joint: Forearm in mid- prone position and wrist joint at neutral position
• Knee joint: Knee in slight flexion
• Ankle: Ankle dorsiflexed at around 90 degrees and toes slightly extended

PROCEDURE (across the elbow; similar procedure is followed for bandaging across wrist, knee and ankle) 

1) ANCHOR the bandage by wrapping it around the forearm 2 times

2) Wrap diagonally upwards across the front of the elbow, wrap 1.5 times around the upper arm

3) Wrap diagonally downwards across the elbow and wrap it 1.5 times around the elbow

4) Repeat, overlap the bandage each time overlapping 2/3rd of the previous turn

5) Check capillary refill to make sure that it isn't cutting off the blood circulation to the limb


TIP AND TRICKS: 
1. While bandaging across the elbow, start from flexor aspect of forearm (so that it remains more secure)

2. While bandaging across the ankle, start from lateral end of the dorsum of foot rather than from the plantar aspect to avoid any discomfort to the patient while walking

3. While bandaging across the wrist joint, try not put more than 2 rounds of bandage between the thumb and index finger (so that the bulk of the bandage doesn't limit the movement of thumb)

4. The end of figure of eight bandage and knot placement should be at the inner or medial aspect of the joints to prevent it from being undone


VIDEO LINK: 

For all types of bandaging done around a limb: https://youtu.be/C8VfEVZVyHc 


Written by our guest authors Bhakti Vijaykumar Dongare and Anveshi Nayan
Illustrations by Anveshi Nayan
#Ae(ONE)INTERN

MAGNESIUM SULFATE & GLYCERINE DRESSING


REQUIREMENTS:

Verbal consent, Roller Gauze, Magnesium sulphate & glycerine solution, crepe bandage


PROCEDURE:

This is done for symptomatic relief in patients with limb edema.

1.     Take magnesium sulphate granules and mix it with glycerine using one finger (20 gm MgSO4: 100  ml Glycerine ratio)     

Magnesium sulphate decreases the limb edema.
Glycerine acts as a moisturiser.

2.     Take thin layer of gauze piece and soak it in the solution just made 

3.     Soak it completely so that no part of gauze is dry        

4.     Apply this over the edematous limb without any wrinkle in a spiral bandaging manner

5.     Cover it well with crepe bandage, you can cover this by stockings

6.     Advice to patient                  

      Keep limb elevated while resting 

      Avoid static isometric activities eg. Prolonged standing       

      Encourage rhythmic isotonic movements eg. Swimming, massaging

      Daily wearing of below-knee stockings 

      Regular washing and keep the limb clean

      Wear soft rubber soled shoes and take regular care of feet

Written by our guest author Varad Chandak
#Ae(ONE)INTERN

Maggot removal

1. Expose the wound area completely & inspect the wound for surface maggots. If seen, just remove them with tweezers or plain forceps

2. Irrigate the wound with saline or water, to clear off the pus and slough if any, and surface maggots if any. Irrigation of the area can lift maggots off the surface of the wound if it is a shallow area and the maggots are of medium size, small maggots are more difficult to irrigate off as they tend to stick in the crevices of the wound tissue

3. Generally they tend to hide in cavities or crevices (for e.g. in between the toes), so you need to force them out. This is done by suffocation method

4. Pour turpentine oil over the wound and if there are cavities or hard to reach crevices, soak gauze swabs with turpentine and apply them over the wounds and leave them there for some time (generally 4-5 minutes, but may take longer as well). Don't leave the swab for too long because if the maggots die, it becomes very difficult to remove them mechanically from the cavities

5. Due to suffocation, the maggots come out of cavities, head first. Then remove them with tweezers or plain forceps. Do this procedure keeping in mind the immediate disposal of maggots as soon as they are removed to prevent spread

6. Carry out debridement of the wound by clearing the slough and dead tissue using surgical blade (mostly 21-24G)

7. Finally, clean the wound with betadine and do proper dressing of the wound, ensuring no openings are left in the dressing and advice alternate day dressing to keep the wound healthy and prevent reinfestation cavities with betadine. Pack the soaked gauze pieces to prevent further infection

*NOTE: H2O2 is contraindicated for cleaning of such a wound 

VIDEO LINKS: 
1)Debridement of the wound and saline irrigation https://youtu.be/VrHp46ibsM8

2) How pouring of turpentine oil could be enough to force the maggots out https://youtu.be/22MMK9cM2hc


Written by our guest author Omkar Doiphode
#Ae(ONE)INTERN